My Classic Lemon and Ricotta Cheesecake
A wonderfully light and elegant alternative to the classic cream cheese version. This lemon and ricotta cheesecake offers a beautiful, slightly grainy texture and a zesty finish.
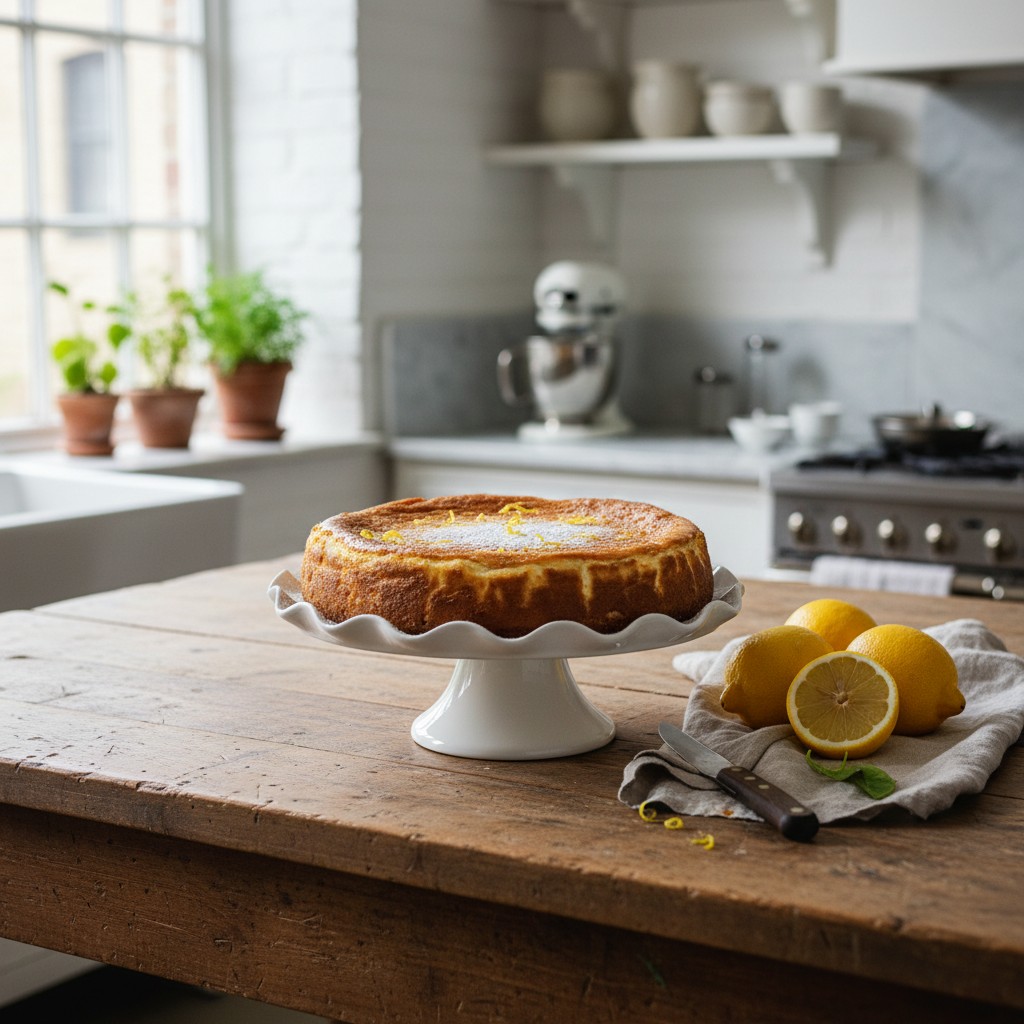
There are cheesecakes, and then there is the Italian-style ricotta cheesecake. It occupies a different world from its dense, super-rich American cousin. Using good quality, full-fat ricotta gives a result that is altogether lighter, more delicate, and has a wonderfully subtle, slightly grainy texture that I find utterly compelling.
This recipe is one I have refined over many years to ensure success every single time. The bright, sharp flavour of fresh lemons cuts through the creaminess of the cheese beautifully, and a simple, buttery digestive biscuit base provides the perfect textural contrast. It feels sophisticated and special, yet it is surprisingly straightforward to make if you follow the steps with care.
It is, for me, the perfect dessert to end a special meal. It can be made a day ahead, which is always a blessing when you're entertaining, and it needs nothing more than perhaps a few fresh raspberries alongside. This is a recipe to teach you the technique of gentle baking, a skill that will serve you well in all your future kitchen endeavours.
Why You'll Love This Recipe
- Ricotta cheese provides a lighter, less dense texture than traditional cream cheese, resulting in a more elegant, Italian-style dessert.
- Baking the cheesecake in a water bath (bain-marie) is the secret to a creamy, even texture and prevents the surface from cracking.
- A classic digestive biscuit base offers the perfect crunchy, slightly salty counterpoint to the smooth, zesty filling.
- Cooling the cheesecake gradually in the turned-off oven is a critical step that prevents sudden temperature changes, which can cause cracks.
Ingredients
- 250g digestive biscuits
- 125g unsalted butter, melted
- 900g full-fat ricotta cheese, drained if very wet
- 200g caster sugar
- 4 large free-range eggs
- Finely grated zest of 2 large unwaxed lemons
- 60ml fresh lemon juice (from the 2 lemons)
- 1 tsp vanilla extract
- 2 tbsp plain flour
Equipment Needed
23cm (9-inch) springform cake tin · Food processor or rolling pin · Large mixing bowl · Electric hand whisk or stand mixer · Spatula · Large, deep roasting tray · Heavy-duty aluminium foil · Baking parchment
Step-by-Step Instructions
- First, preheat your oven to 160°C (140°C fan, Gas Mark 3). You will need a 23cm (9-inch) springform cake tin. To prepare it, grease the base and sides lightly, then line the base with a circle of baking parchment.
- Now, for the base. Place the digestive biscuits into a food processor and pulse until they form fine crumbs. Alternatively, put them in a strong plastic bag and crush them with a rolling pin. Tip the crumbs into a bowl, pour over the melted butter and mix thoroughly until all the crumbs are moistened.
- Press this mixture firmly and evenly into the base of the prepared tin. I find using the back of a metal spoon is best for this. Place the tin in the refrigerator to chill while you make the filling.
- To make the filling, place the ricotta cheese in a large bowl and beat it with an electric hand whisk (or in a stand mixer) for about 2 minutes until it is smooth and creamy. Add the caster sugar and beat for another minute.
- Add the eggs one at a time, beating well after each addition and scraping down the sides of the bowl to ensure everything is incorporated. It is important not to rush this stage.
- Gently fold in the lemon zest, lemon juice, vanilla extract, and the sifted plain flour using a large metal spoon or spatula until just combined. Do not overmix.
- Now, prepare the tin for its water bath. Tear off two large sheets of heavy-duty aluminium foil and place them on your work surface in a cross shape. Place the chilled springform tin in the centre and carefully wrap the foil up and around the sides of the tin to make it completely waterproof. Pour the ricotta filling over the chilled biscuit base and smooth the top.
- Place the wrapped tin inside a large, deep roasting tray. Pour freshly boiled water from a kettle into the roasting tray to come about halfway up the sides of the cake tin. Be very careful not to splash any water into the cheesecake.
- Carefully transfer the roasting tray to the preheated oven. Bake for 55-60 minutes. The cheesecake should be set around the edges but still have a slight wobble in the very centre when you gently shake the tray. Do not be tempted to overbake it.
- Turn off the oven, prop the door open slightly with a wooden spoon, and leave the cheesecake to cool completely in the oven for at least 2 hours. This gradual cooling is the key to preventing cracks.
- Once completely cool, remove the tin from the water bath, discard the foil, and transfer the cheesecake (still in its tin) to the refrigerator to chill for at least 6 hours, or preferably overnight.
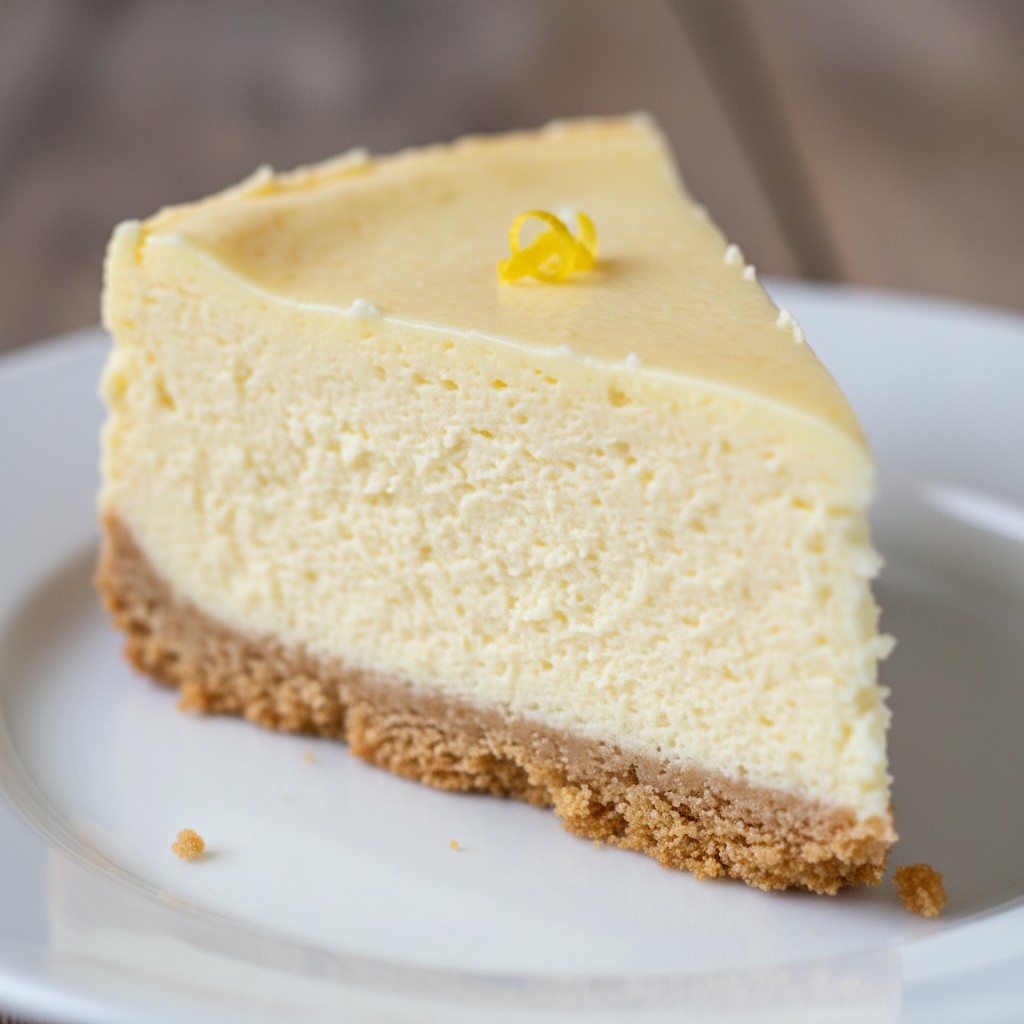
- To serve, run a thin, sharp knife around the edge of the cheesecake before carefully releasing the springform clip. Slide it onto a serving plate.
Delia's Notes from the Kitchen
The secret to a truly sublime ricotta cheesecake is patience. Don't be tempted to rush the cooling process; allowing it to cool gradually in the oven with the door ajar is what guarantees that flawless, uncracked surface we're all aiming for. It's a small step that makes all the difference.
How to Store & Reheat
The cheesecake must be stored, covered, in the refrigerator. It will keep well for up to 3 days. It is designed to be eaten chilled and does not require any reheating.
Frequently Asked Questions
Why did my cheesecake crack on top?
Cracks are usually caused by one of three things: over-mixing the batter (which incorporates too much air), over-baking, or cooling the cheesecake too quickly. Following the gradual cooling method in the turned-off oven is the most effective way to prevent this.
Can I use low-fat ricotta?
I strongly advise against it. Full-fat ricotta is essential for the creamy texture and rich flavour of the cheesecake. Low-fat versions contain more water and will result in a disappointingly wet and grainy texture.
Is the water bath absolutely necessary?
Yes, I'm afraid it is. The steam from the hot water creates a humid environment in the oven, which allows the cheesecake to bake gently and evenly. It is the single most important step for achieving that signature smooth, creamy consistency and a crack-free surface.
How do I know for sure when the cheesecake is cooked?
The visual cue is key. After about an hour, the outer 2-3 inches of the cheesecake will look set and matte, while the very centre (a circle about 2 inches across) will still look glossy and have a distinct wobble when you gently nudge the tin. It will continue to set as it cools.
Can I freeze this cheesecake?
Yes, you can. Once completely chilled, you can freeze it whole or in slices. Wrap it well in cling film and then a layer of foil. To defrost, place it in the refrigerator overnight. The texture of the ricotta may change very slightly, becoming a little more grainy, but it will still be delicious.