My Foolproof Melting Chocolate Puddings
There are few desserts that possess the same dramatic flair as a melting chocolate pudding. With my step-by-step guide, you can achieve that perfect molten centre with confidence.

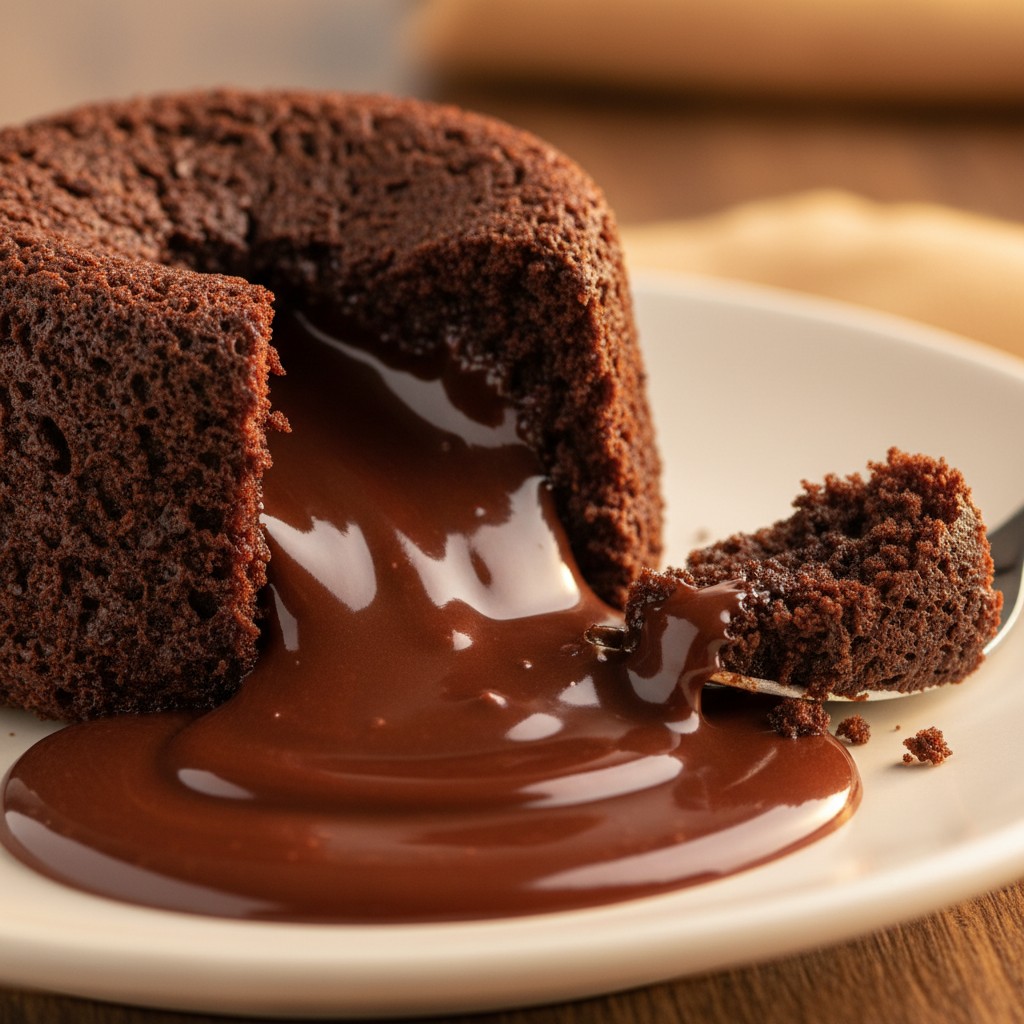
There are few desserts that possess the same dramatic flair as a melting chocolate pudding. That moment when a spoon breaks through the light, springy sponge to release a stream of liquid chocolate is pure kitchen theatre, and something that never fails to delight. It’s the sort of pudding that seems to belong solely to the world of restaurant chefs, but I’m here to tell you that’s simply not the case.
The secret, as with so many things in cookery, lies not in some arcane skill but in precision and good timing. This recipe demystifies the process, breaking it down into simple, manageable stages. We use the best-quality chocolate we can find, because its flavour is front and centre, and we pay close attention to our oven.
So, banish any thoughts of this being too tricky. With a little care and this reliable method, you will be able to produce four perfect little puddings that will have your guests thinking you’ve spent hours slaving over a hot stove. It’s the perfect end to a special meal, and our little secret.
Why You'll Love This Recipe
- Using high-quality dark chocolate (at least 70% cocoa solids) provides a deep, intense flavour that isn't overly sweet, which is essential for a grown-up dessert.
- The precise cooking time and temperature are calculated to cook the outside of the pudding perfectly while leaving the centre just-melted, creating the signature 'lava' flow.
- Thoroughly buttering and dusting the ramekins is a non-negotiable step. This creates a barrier that ensures the delicate puddings turn out cleanly without sticking.
Ingredients
- 100g best-quality dark chocolate (70% cocoa solids), broken into small pieces
- 100g unsalted butter, cubed, plus extra for greasing
- 2 large free-range eggs
- 2 large free-range egg yolks
- 50g golden caster sugar
- 2 tbsp plain flour
- 1 tbsp cocoa powder, for dusting
Equipment Needed
Four 150ml ramekins · A small baking tray · Heatproof bowl · Small saucepan · Electric hand whisk · Large mixing bowl · Spatula or large metal spoon · Sieve
Step-by-Step Instructions
- First, we must prepare our dishes, which is a crucial step. Take four 150ml ramekins and butter them very, very thoroughly, getting into every corner. Place the cocoa powder into one ramekin, then roll it around to coat the inside completely. Tip the excess into the next ramekin and repeat until all four are coated. This ensures they won't stick. You can place them on a small baking tray.
- Now, for the chocolate mixture. Place a heatproof bowl over a saucepan of gently simmering water, ensuring the base of the bowl doesn't touch the water. Add the chocolate and the butter to the bowl and allow them to melt slowly, stirring occasionally with a spatula until smooth and glossy. Once melted, remove the bowl from the heat and set it aside to cool slightly.
- Pre-heat your oven to 200°C (180°C Fan, Gas Mark 6).
- In a separate, large bowl, using an electric hand whisk, beat the whole eggs, egg yolks, and golden caster sugar together. You need to continue whisking for about 3-4 minutes, or until the mixture is pale, thick, and has doubled in volume. You are looking for the 'ribbon' stage, where the mixture leaves a trail on the surface when you lift the beaters.
- Gently pour the slightly cooled chocolate mixture over the egg mixture. Using a large metal spoon or spatula, carefully fold the chocolate in until just combined – be careful not to knock out all the air you've incorporated.
- Sift the plain flour over the top and fold that in as well, using the same light touch, until there are no more streaks of flour.
- Carefully divide the mixture evenly between the four prepared ramekins. At this stage, you can bake them immediately or cover and chill them in the fridge for up to 4 hours.
- Place the baking tray with the ramekins into the pre-heated oven and bake for 12-14 minutes. The edges should be set and coming away from the sides, but the very centre should still have a slight wobble. This timing is critical.
- Remove from the oven and let them stand for just 1 minute. No longer. Then, carefully run a small palette knife around the edge of each pudding, place a serving plate on top of the ramekin, and confidently invert it. Lift the ramekin away.
- Serve immediately, perhaps with a light dusting of icing sugar and a spoonful of crème fraîche or a scoop of vanilla ice cream.
Delia's Notes from the Kitchen
A final word on timing. This is the absolute key to success. Every oven has its own personality, so I do recommend a trial run if you're making these for a truly special occasion. An extra minute is the difference between a molten centre and a lovely, but not quite right, chocolate sponge. Trust your timer, trust the wobble, and you will be rewarded.
How to Store & Reheat
These puddings are designed to be eaten the moment they leave the oven. However, you can prepare the batter, pour it into the prepared ramekins, cover with cling film, and keep them in the refrigerator for up to 4 hours before baking. If baking from chilled, you may need to add an extra minute to the cooking time. I do not recommend reheating a cooked pudding as it will lose its molten centre.
Frequently Asked Questions
Why didn't my pudding have a molten centre?
This is almost always due to over-baking. Even 60 seconds too long in the oven can cause the centre to cook through. Every oven is different, so it's worth getting to know yours. The top should be firm but the very centre should still have a distinct wobble when you take them out.
Can I make these ahead of a dinner party?
Yes, absolutely. The best way is to prepare the puddings right up to the point of being poured into the ramekins. Cover them and pop them in the fridge for up to 4 hours. You can then bake them to order just as you're serving dessert.
What is the best chocolate to use for melting puddings?
The flavour of the chocolate is paramount here, so you must use the best you can afford. I always specify a dark chocolate with at least 70% cocoa solids. This gives a deep, rich, and not-too-sweet flavour that is perfectly balanced.
My puddings stuck to the ramekins. What did I do wrong?
This happens when the ramekins are not prepared properly. You must be very thorough when you butter them, ensuring every single bit of the inside surface is coated. The dusting of cocoa powder then provides a second, non-stick layer. Don't be tempted to skip this step!
Can I make one large pudding instead of individual ones?
I wouldn't recommend it for this recipe. The cooking dynamics are based on the small, individual size. A larger pudding would require a completely different cooking time and temperature, and it would be very difficult to achieve a molten centre without the outside burning or drying out.