My Definitive Guide to a Perfect Roast Chicken
There is little that can rival the sheer comfort and satisfaction of a perfectly roasted chicken. This is my time-honoured method for achieving a wonderfully moist bird with crisp, golden skin.
There are some dishes so fundamental to our culinary landscape that they almost define what it means to cook at home. For me, and for so many of us in Britain, the roast chicken is precisely that dish. It is the centrepiece of the Sunday lunch, a source of comfort, and a meal that brings families together around the table. Yet, for all its familiarity, it can be the cause of some anxiety – the fear of dry breast meat or, heaven forbid, undercooked legs.
Over the years, I have roasted more chickens than I could possibly count, and what I have learned is that perfection is not about complicated marinades or fancy techniques. It is, as is so often the case in cooking, about understanding a few key principles and executing them with care. It's about respecting the ingredient and knowing exactly how to treat it to bring out its absolute best. There is a simple, reliable path to a gloriously golden, succulent roast chicken, and it is one I am most happy to share.
So, put any past disappointments aside. This is not just a recipe; it is a method, a lesson in how to achieve something truly special with the most straightforward of ingredients. Once you have mastered this, you will have a skill for life, and the confidence to produce a perfect roast chicken, time and time again.
Why You'll Love This Recipe
- Starting the chicken breast-side down is the absolute key. This technique allows the juices from the thighs to run down into the breast meat as it cooks, ensuring it remains incredibly moist and succulent.
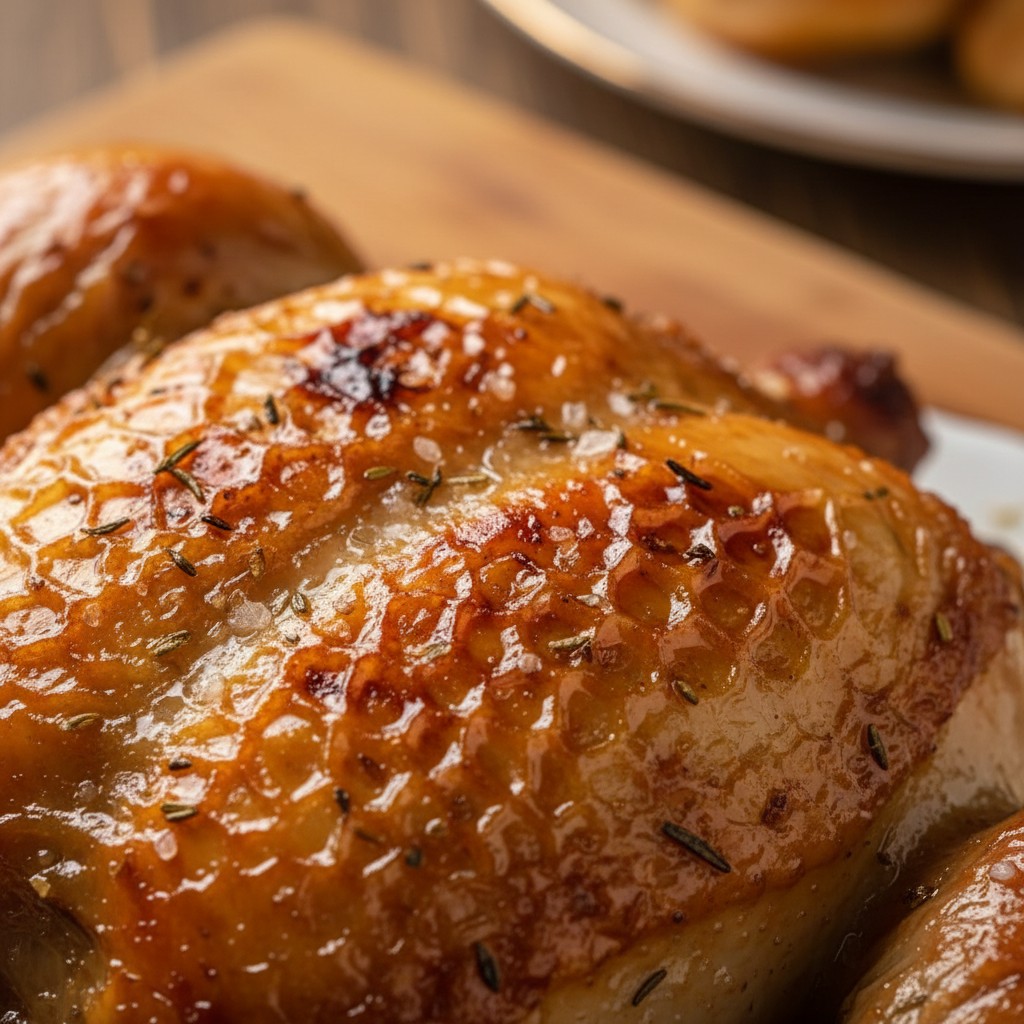
- A very hot initial oven temperature helps to crisp the skin and seal the outside of the bird, before it's lowered to allow the inside to cook through gently and evenly.
- Simplicity is paramount. A good quality bird needs only butter, salt, and pepper to shine. This method focuses on the pure, unadulterated flavour of the chicken itself.
Ingredients
- 1 x 1.5kg (3 lb 5 oz) good-quality free-range or organic chicken
- 40g (1½ oz) butter, softened
- 1 large onion, peeled and halved
- Salt and freshly milled black pepper
- For the Gravy:
- 1 tablespoon plain flour
- 300ml (10 fl oz) good-quality chicken or vegetable stock
Equipment Needed
A good, solid roasting tin (not non-stick if making gravy) · Kitchen paper · Carving board · Carving knife and fork · Skewer · Foil
Step-by-Step Instructions
- First things first, take the chicken out of the refrigerator about an hour before you intend to cook it. This allows it to come to room temperature, which is crucial for even cooking. Preheat your oven to its highest setting, Gas Mark 8, 450°F (230°C).
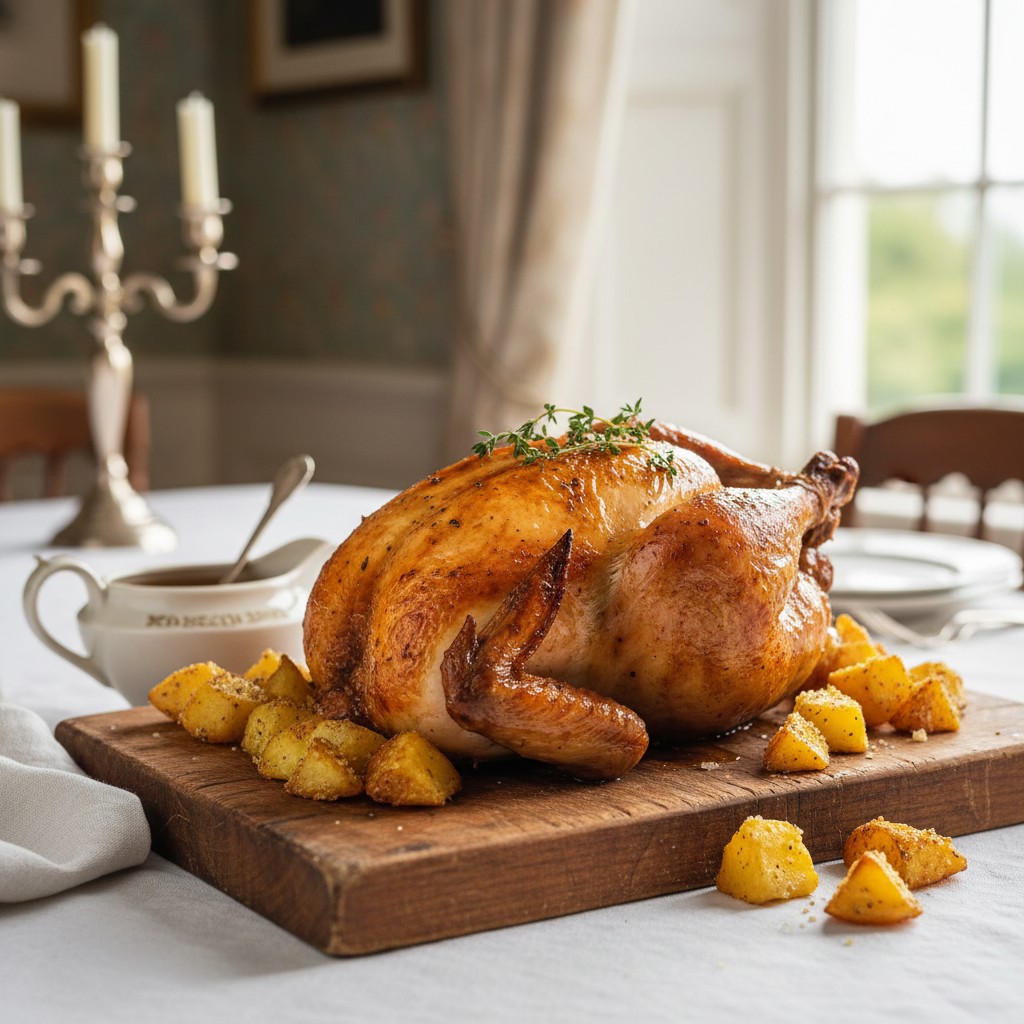
- Place the chicken in a roasting tin that's just a little larger than the bird itself. There's no need to add any oil to the tin. Using your hands, smear the softened butter all over the skin of the chicken, making sure to cover the legs and wings as well. Season it very generously, inside and out, with salt and freshly milled black pepper. Place the onion halves inside the cavity.
- Now for the important part: place the chicken in the tin breast-side down. This is my non-negotiable rule for a moist breast. Put it into the centre of the preheated oven and cook for 15 minutes.
- After 15 minutes, turn the oven temperature down to Gas Mark 5, 375°F (190°C). Continue to cook the chicken, still breast-side down, for a further 45 minutes.
- Now, carefully remove the roasting tin from the oven. Using a couple of forks or a clean cloth to protect your hands, turn the chicken over so it is now breast-side up. Return it to the oven and cook for a final 30 minutes. This will give you that wonderfully crisp, golden-brown skin.
- To check it's cooked, pierce the thickest part of the thigh with a skewer. The juices should run clear with no trace of pink. If they don't, return it to the oven for another 10 minutes and check again.
- Transfer the cooked chicken to a warm carving board and cover it loosely with foil. It is absolutely essential to let it rest for at least 15-20 minutes before carving. This allows the juices to settle back into the meat.
- While the chicken rests, make the gravy. Tilt the roasting tin and spoon off most of the fat, leaving the meaty juices behind. Place the tin over a medium heat on the hob, sprinkle in the flour and stir it into the juices to form a paste. Cook for a minute, then gradually whisk in the stock. Bring to a simmer, scraping up all the lovely caramelised bits from the bottom of the tin, and let it bubble away for a few minutes until thickened. Season to taste and pour into a warm gravy boat.
Delia's Notes from the Kitchen
The secret to a truly magnificent roast chicken lies not in a long list of ingredients, but in the quality of the bird and the precision of the method. Do try to buy the best chicken you can afford; the flavour will be incomparable. And please, I must insist, do not be tempted to skip the resting period; it is absolutely non-negotiable for a succulent result. This is the one recipe that, once mastered, will serve you well for a lifetime of happy Sunday lunches.
How to Store & Reheat
Leftover chicken should be cooled completely, then stripped from the bone, wrapped well in foil or cling film, and stored in the refrigerator for up to 3 days. It is wonderful cold in sandwiches with a little mayonnaise and black pepper. I don't recommend reheating whole pieces of roast chicken as it can become dry; however, leftover meat is perfect for using in a pie, curry, or a simple chicken and noodle soup.
Frequently Asked Questions
How do I know for certain when the chicken is cooked?
The most reliable way is to pierce the thickest part of the thigh with a skewer. The juices that run out must be completely clear, with no hint of pink. If you have a meat thermometer, the internal temperature should read at least 74°C (165°F).
Should I cover the chicken with foil while it roasts?
No, not with this method. The high initial heat and the final 30 minutes of roasting breast-side up are designed to give you a wonderfully crisp skin. Covering with foil will trap steam and result in a softer skin.
Can I stuff the main cavity of the chicken?
I generally prefer to stuff the neck-end only, as stuffing the main cavity can prevent the heat from circulating properly and significantly increase the cooking time. If you do stuff the main cavity, you must weigh the chicken after stuffing and recalculate the cooking time.
Why is it so important to rest the chicken before carving?
This is perhaps the most crucial step and the one people are most tempted to skip. While the chicken cooks, the muscle fibres tighten and push the juices to the centre. Resting allows the fibres to relax and reabsorb all those lovely juices, resulting in meat that is tender and succulent. Carving too early will cause the juices to run out onto the board, leaving you with dry meat.
My roasting tin has burnt bits on the bottom. Can I still make gravy?
Those 'burnt bits' are not burnt at all! They are caramelised meat juices and are packed with flavour. As long as they are dark brown and not black and acrid, they are the foundation of a fantastic gravy. Deglazing the pan with your stock will lift them all off the bottom and into your sauce.